
Paper punches are one of the most versatile tools in your scrapbooking supply stash. They can be used to make everything from flower embellishments to pretty decorative borders, turning scraps of paper that would otherwise go to waste into cute accents for all your favorite memories.
Circle Punch Flower
A flower made from a collection of punched paper circles is an easy and inexpensive way to accent your scrapbook layout. These circle flowers can be used to decorate everything from Easter to baby shower scrapbook pages. Use one flower to accent a title or arrange several flowers together to make a decorative border.
Supplies
- Circle punch
- Double-sided scrapbook paper
- Acid-free glue stick or double-sided tape
- Button, decorative brad, or rhinestone
Instructions
1. Punch nine circles from your paper.
2. Fold the first circle in half, then hold in in half again so you have four equal parts. Open the circle and lay it flat.

3. For the remaining several circles, fold in half. Unfold, then fold the left and right sides in at an angle to create a v-shaped petal.

4. Glue the eight folded circles to the center of your first circle. Arrange them so you have two petals on each quarter portion of the first folded circle.

5. Add a button, decorative brad, or rhinestone to the center of your flower. If desired, push up some of the flower petals for a slight 3D effect.
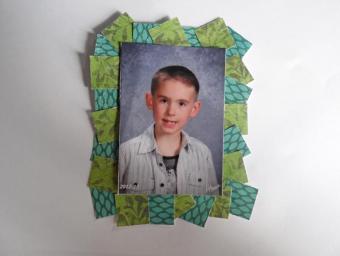
Patchwork Photo Frame
A patchwork photo frame can be somewhat time consuming to create, but this design is an excellent way to draw attention to a focal point photo on your scrapbook layout. The basic technique can be adapted to work with horizontal and vertical photos of any size, and you can use different shapes of paper punches to get different looks.
Supplies
- Square punch
- Scrapbook paper in two or more coordinating patterns and/or colors
- Cardstock
- Photo
- Ruler
- Acid-free glue stick or double-sided tape
Instructions
1. Measure your photo and cut a cardstock backing that is ½ inch larger than the photo. It does not matter what color the cardstock backing is because it will not show in the finished project.

2. Punch several squares from your paper scraps.
3. Glue the scraps around the edge of your cardstock backing, running over the edge and overlapping as needed. The goal is to create a funky, eclectic design that looks like a patchwork quilt.

4. Glue your photo on top of the frame. Add the frame to the desired spot on your finished scrapbook layout.
Peek-a-Boo Border
When most of us think of scrapbook punch art, we imagine the shaped punch out (sometimes called the "punchie") as the most useful part of the paper. However, the background paper can be used in interesting ways as well. If you're on a tight budget, make the most of your supplies by turning punched background paper into a cute border for your next layout.
Supplies
- Heart shaped paper punch
- Patterned scrapbook paper
- Cardstock in a color that coordinates with your patterned paper
- Decorative scrapbook scissors
- Brown or black fluid chalk ink (optional)
- Acid-free glue stick or double-sided tape
Instructions
1. Punch several hearts along the bottom horizontal edge of your scrapbook cardstock. Set the punched out hearts aside for another project.

2. Cut approximately 3/4 of an inch above the punched out heart window using your decorative scissors. Set the remaining portion of the cardstock aside for another project.

3. Ink the edge of your cardstock to give the border added definition, if desired.

4. Adhere the cardstock border to the bottom of your patterned paper. The patterned paper will "peek" through the heart shaped windows. Add photos, journaling, and a title to finish your scrapbook layout.

Creative Scrapbook Punch Art
The ways in which you can use your scrapbook punches are limited only by your imagination. Consider setting aside some time to experiment with your collection of paper scraps to see what fun punch art designs you can create.


