
Punch art can be a wonderful way to embellish your scrapbook pages without breaking your budget. With just a few simple punches and scraps of paper left over from other projects, you can design embellishments suitable for almost any type of scrapbook layout.
Simple Ways to Use Punch Art
Creating your own punch art for your scrapbook pages doesn't have to be difficult. Here are some simple punch art ideas you can try on your next scrapbooking project.
Ball
Draw on simple stitching to turn circles into beach balls, basketballs, or baseballs for your scrapbook page. Create these in different sizes to add visual appeal.
Baby
Punch a circle from white or tan cardstock. Punch a larger scalloped border circle from patterned paper. Layer the cardstock circle on top of the patterned paper circle. Add a pink eyelet in the middle to make the baby's mouth. Draw eyes and a nose with a fine tipped black marker, and you'll have a baby's face with a bonnet.
Borders
Design a fun border by connecting a row of punched circles with coordinating ribbon. Just remember to reinforce the holes with small eyelets if you're using thinner patterned paper.
Cake
Punch three squares of progressively smaller sizes. Round the corners, then stack from largest to smallest to make a birthday cake decoration that can be embellished with fine tipped markers.
Chocolate Chip Cookie
Cut a small notch out of a brown circle using scalloped decorative edge scissors to resemble a bite taken out of the cookie. Add black mini brads to the circle to make a cute chocolate chip cookie accent for your layout.
Christmas Tree
Layer several rows of upside down green heart punches, in a sort of pyramid shape, to make your own Christmas tree accent. Decorate your tree with smaller punched shapes or other embellishments if desired.
Clouds
Create an abstract cloud by arranging two white punched hearts so they are right next to each other with a flat horizontal line at the bottom.
Easter Eggs
Decorate punched ovals to look like eggs for an Easter scrapbook page. To make this even easier, use pretty patterned paper with your punch.

Flower
Make your own abstract flower embellishments by laying three progressively smaller circles on top of each other, then adding a button or brad for the flower center.
House
Use a fine tipped marker to decorate tag punches to look like a row of tiny houses. Make grass for your embellishment with patterned washi tape.

Pinwheel
Punch four squares from patterned paper. Cut each square in half diagonally. Arrange the cut triangles in a pinwheel shape, then add a button or brad to the center.
Present
Add a ribbon bow to the top of a punched square to make a present embellishment for a birthday scrapbook layout. If you only have a small square punch, arrange four squares with a small border between them to make a bigger present embellishment.

Shamrock
Combine three green paper hearts in a circle, points facing inward, with a small rectangle stem, to create a shamrock design for a St. Patrick's Day layout.
Springtime Bouquet
Combine several different flower and leaf punches together to make a one-of-a-kind bouquet to accent a springtime scrapbook page.
Snowman
Stack three progressively smaller circles punched from white paper to make your own snowman embellishment for a winter layout. Add details with markers, buttons, brads, stamps, or other items.
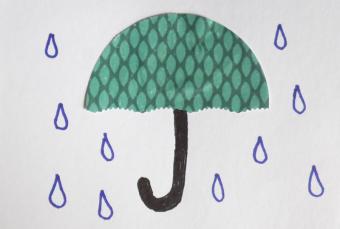
Umbrella
Cut a punched circle from patterned paper in half with decorative scalloped edge scissors, then draw on an umbrella handle to make an accent for a rainy day page.
Adding Interest to Punched Shapes
When punching shapes for a scrapbook layout, you may want to consider trying one of the following techniques to add a bit of pizzazz to your design:
Paper Type
Instead of limiting yourself to plain cardstock or patterned paper, try punching shapes from specialty papers. You can now purchase cardstock with glitter, a metallic finish, or a pearlescent sheen. Some companies are making patterned papers accented with glitter or flocking. Any of these options would be great for adding interest to your punch art.
Inking
Lightly run a black or dark brown ink pad over the edges of your cardstock-punched shapes to give your punch art definition.
Embossing
Use an embossing template to add a design to plain cardstock before punching out your shape.
Foam Adhesive
Mounting punched shapes onto your paper with foam adhesive is a wonderful way to give them a bit of extra dimension.
Ultra Thick Embossing Enamel (UTEE)
If you cover your shapes in UTEE, you'll end up with a raised and slightly shiny look. Bend the shape back and forth to create a cracked glass effect.
Chalk Stencils
Instead of using your punched shapes as is, you can take the sheet you punched your shape from and use it as a stencil for making a chalked design on your scrapbook page. This is a wonderful way to get more use out of your collection of punches, since you'll get a different look for your page without spending any extra money.
About Paper Punches
Paper punches are crafting tools used to create various designs from cardstock and patterned paper. Paper punches come in a variety of shapes, ranging from simple circles and squares to elaborate flowers or seasonal designs, such as ghosts for Halloween and snowflakes for winter. Mini punches can make shapes as small as ¼", while jumbo paper punches can make shapes as large as 3".
Casual crafters often choose to purchase paper punches instead of investing in a Cricut personal electronic cutter or a Cuttlebug die cut machine because the punches are fairly inexpensive and easy to use. Punches are available at large craft stores such as Hobby Lobby or Michaels Crafts, and from websites that specialize in selling scrapbook supplies.
Low Cost Creativity
If you enjoy punch art, it is a good idea to start a file of paper scraps arranged by color and pattern so you have lots of paper to play with as you're designing embellishments for your scrapbook layouts. As you're creating unique designs with your paper punches, you can enjoy the satisfaction of knowing that you're making the most of your supply stash.


