
A decorative border can often be the perfect finishing touch for a scrapbook page, but purchased borders are cost-prohibitive for the scrapbooker on a tight budget. Save money and express yourself by creating your own borders using the items already in your supply stash.
Washi Tape Border
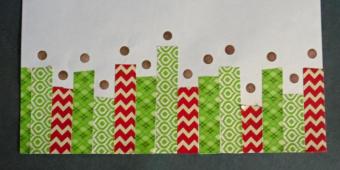
Washi tape is available in an endless number of colors and patterns, making it perfect for quick and easy scrapbooking.
Supplies
- Three to six different washi tape designs
- Ink pad in a color that coordinates with your washi tape
- Pencil with an unused eraser
Instructions
- Run strips of washi tape down the side of your paper, placing each strip directly next to the one before it, in alternating designs. Cut the strips of tape so they are all slightly different lengths, creating a random effect.
- Press the eraser end of your pencil into the ink pad. Use it to stamp a dot after each strip of washi tape.
Folded Paper Border

An origami-inspired folded paper border is an excellent way to turn your paper scraps into useful embellishments for your next layout.
Supplies
- Three to eight equal-size squares of scrap paper
- Three to eight brads, eyelets, or rhinestones
- Glue stick or double-sided tape
Instructions
- Place your paper with the patterned or colored side face down. Fold in half diagonally, crease well, and unfold. Fold in half along the other diagonal, crease well, and unfold.
- Fold each of the four corners of the square in to meet the middle intersection of the "X" crease pattern you just created.
- Repeat this process once more, going over the creases with your fingernail to make sure they are nice and sharp.
- Fold each of the four points of the top layer of paper out past the corresponding edge to form small triangles.
- Fold each of the four points on the bottom layer of paper towards the corresponding corner to make four more small triangles.
- Add a decorative brad, eyelet, or rhinestone to the middle of your paper to complete the embellishment.
- Repeat steps 1-6 until you have enough embellishments to make a border for your scrapbook page. The number of embellishments you need depends upon the size of your initial squares and the size of scrapbook layout you wish to make.
- Glue or tape the embellishments to your page to create the finished border. Alternatively, if you're using brads or eyelets for the center of each shape, use them to attach your border.
Corner Punch Border
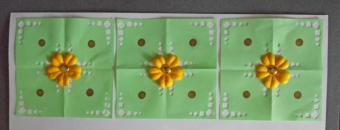
Do you remember the last time you used your corner punch? Here's a fun way to use this photo matting tool to make a scrapbook border, inspired by the paper snowflakes you made as a child.
Supplies
- Three paper squares, sized to fit across the area you want to place your border
- Pencil with an unused eraser
- Ink pad
- Three small scrapbook flowers
- Three scrapbook brads
- Glue stick
Instructions
- Fold your paper square in half horizontally. Fold it in half vertically without unfolding.
- Use your corner punch on two opposite corners of the folded square.
- Unfold the paper.
- Press the eraser end of your pencil into the ink pad. Use it to stamp four dots, one in the middle of each quadrant of the paper.
- Use a scrapbook brad to attach a small flower to the middle of your paper.
- Repeat Steps 1-5 to make a total of three square embellishments. Glue the squares to your layout to form your completed scrapbook border.
More Scrapbooking Border Ideas
Here are a few more ideas for creating your own customized scrapbooking borders:
- Arrange a series of die cut tags in a neat row for an instant page border.
- Attach a row of eyelets or mini brads to a thin cardstock strip for a contemporary looking border for your scrapbook project. Accent with tiny squares cut from the index prints you receive from your photo developer.
- Adhere circles punched from various papers at random intervals to your scrapbook border. Stitch buttons in different colors and sizes onto some of the circles to add depth and texture.
- Weave fibers through a strip of mesh for an organic look that's great on a boy-themed scrapbook page.
- Try doodling on your page for a casual and whimsical look. Draw a few swirls with a black journaling pen, then highlight them with chalk for a touch of color. You could also use doodles to give a free printable scrapbook border a personalized touch.
- Use your favorite rubber stamps and some embossing powder to create elegant borders.
- Use acrylic paints to paint a pretty design down the side of your layout. Create an ombre look by fading colors from dark to light.
- Dig out your sewing machine and make a border comprised of several decorative stitches. If you don't have thread in a color that matches your layout, sew with no thread for a simple and understated punched look.
- Thread multicolored beads onto thin wire for a striking border filled with color and texture. For a clean look, thread the beaded wire through eyelets and hide the ends on the back of the layout.
Borders Make Scrapbooking a Snap
Borders added to the top, bottom, or side of your page make it a snap to create a stylish scrapbook layout. Have fun experimenting with your supplies to create scrapbook borders that complement all your favorite memories.


